
In the building of the DIY NAS: 2017 Edition, I’d made a potentially tragic mistake of putting it somewhere with zero airflow, which triggered an alert inside FreeNAS about the temperatures of the hard drives. At the time of the alerts, the hard drives were at temperatures between 45 and 62 degrees Celsius (113 to 143 degrees Fahrenheit), which were hot enough that I immediately shut down the NAS and began brainstorming about what could be done to address those high temperatures.
Obviously, the first thing that I tried was moving the case from in between the two pieces of office furniture I’d squeezed it into. Simply giving the intake and exhaust fans room to breathe was enough to drop the hard drives temperatures down to 45 to 55 degrees Celsius (113 to 131 Fahrenheit) which resolved the critical alerts being reported by FreeNAS, but still seemed quite a bit warm to me. At this point, I took two additional steps:
- Replaced the clever magnetic mesh grill on the SilverStone DS380B with a pair of 120mm fan grills.
- I rearranged the hard drives so that there were as many air gaps as possible in the drive cage.

These two steps dropped the temperatures of the hard drives down into a range I was much more comfortable with, between 32 and 40 degrees Celsius (89 to 104 degrees Fahrenheit). However I still had a little bit of concern. What if someone filled up the SilverStone DS380B’s drive cage with 8 drives? What would happen to drive temperatures then?
Looking inside the SilverStone DS380B, there seemed to be a couple different minor flaws which could be resulting in the higher drive temperatures. The drive cage is pretty solidly constructed, without many ways for the air to flow into the drive cage from the case’s intake fans. And more importantly, there was a tremendous gap at the back of the drive cage. As air entered the case and followed the path of least resistance, it was simply going to bypass the drive cage entirely! Of those two flaws, I wound up deciding that solving the drive cage’s air gap was most likely to yield the most results.
Solving the SilverStone DS380B’s Air Gap
After a little bit of Googling, it seemed like the most common solution to this air gap was to cut some cardboard and seal up the air gap, like the UnRAID forum user ‘heffa’ described in this forum post on the UnRAID forums. From a cost and simplicity standpoint, I was a big fan of the cardboard duct solution. If the DIY NAS: 2017 Edition were my own personal machine, I’d most likely wind up implementing something similar using the leftover packaging from the component’s parts and a bit of duct tape.
But as you might know, I’ve been raffling off my NAS builds for quite some time. I was worried that the eventual winner of the DIY NAS: 2017 Edition would find that the cardboard had become dislodged while the NAS was transported to them. I was also a bit concerned that both the winner of the NAS and the general viewing public would think that the cardboard duct was a bit of a crude solution. This made me want to come up with a simpler, more “professional” solution for the air gap.
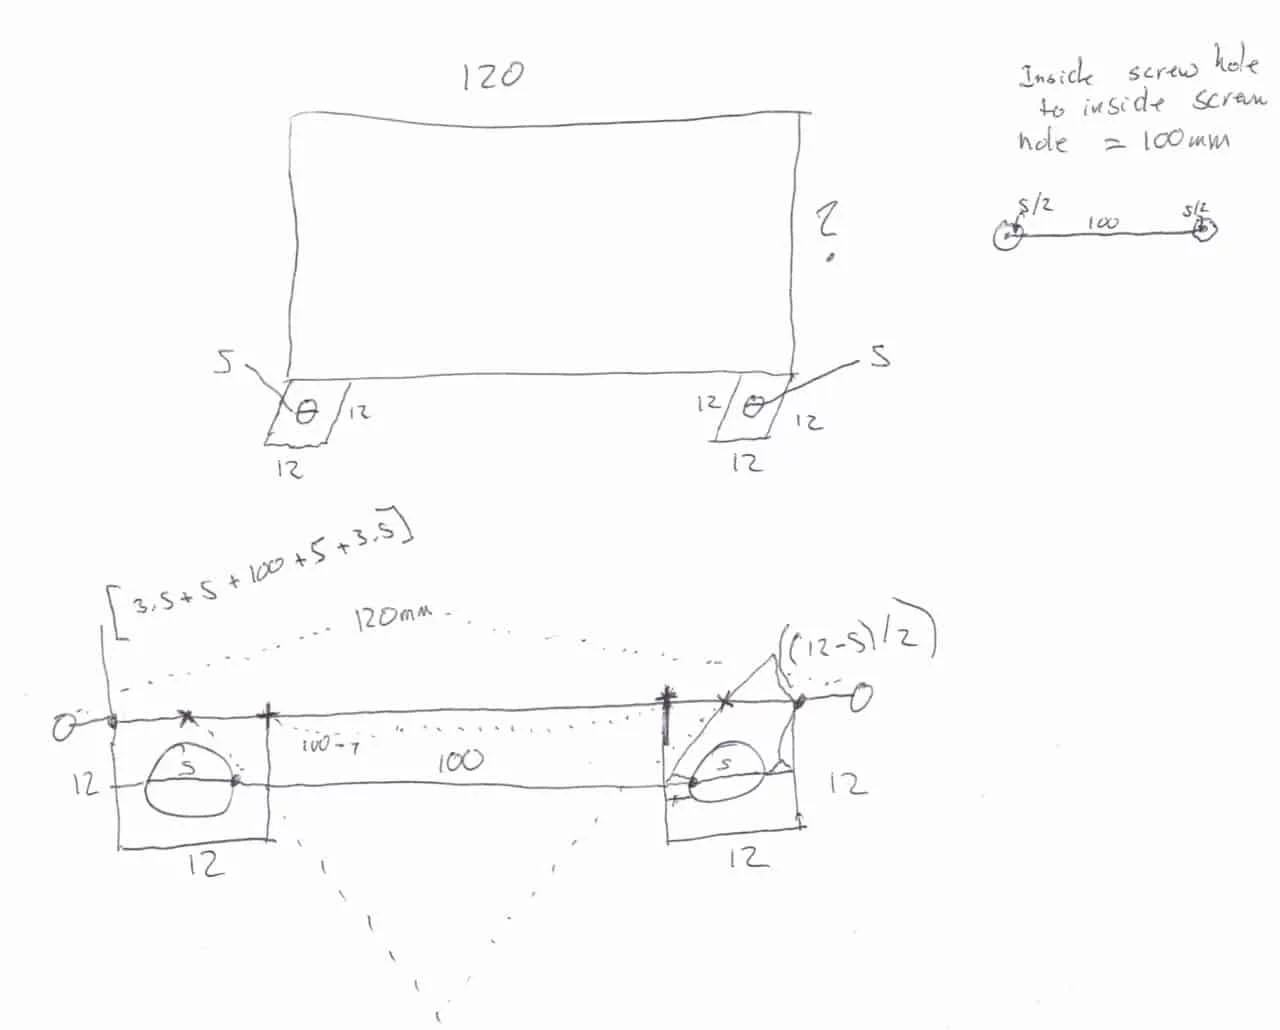
What I wound up noticing was that the end of the drive cage and the end of the case’s intake fans lined up perfectly, which I’m sure is no coincidence. While staring at this gap, a lightbulb came on and I remembered that I had my own 3D printer! I was completely able to 3D design and print my own custom object to close the air gap! I got out my calipers and a spare 120mm case fan, started taking measurement, and jotted down this diagram:
Ultimately, problems exactly like the SilverStone DS380B’s air gap are exactly why I decided to buy a 3D printer! There’s something extremely gratifying about identifying a problem, researching solutions, designing an object to achieve that solution, and then bringing that object to life via a 3D printer. I was able to improve cooling of the hard drives by closing the majority of the case’s air gap; optimizing that airflow would help manage hard drive temperatures and hopefully extend the lives of the hard drives that wound up in the DIY NAS: 2017 Edition.
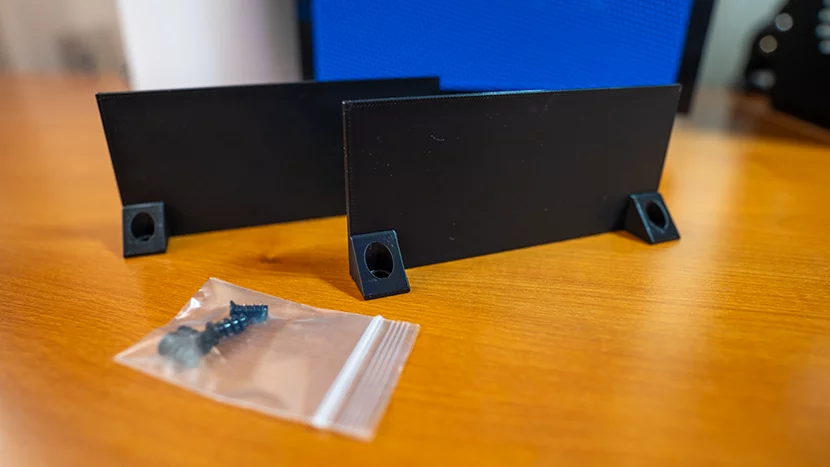
It didn’t take me long at all before I had my first prototype designed and printed.
In screwing the cooling duct down onto the fan for the first time, I felt the model crack and give way a tiny bit. The 90 degree bend around the screw holes simply wasn’t strong enough to withstand much pressure. A good push on the duct would’ve sheared the vertical piece off the duct entirely. While I was confident that this first draft was good enough to accomplish the task at hand, the perfectionist in me wanted to address this issue. A second iteration would also allow me to add some additional material at the bottom of the duct to help fight some of the flexing that happened due to the torque of the screws being tightened.
I wound up adding a couple wedge-shaped pieces to provide support on both sides of the screw holes and I also added extra material along the bottom of the duct in order to help strengthen against the flexing.

Impressed with myself, I immediately printed a pair of the cooling ducts and installed them in the DIY NAS: 2017 Edition. At the same time, I began affectionately referring to them as my “duct faces.” The next time I saw Pat, I demurely asked him “Hey, wanna see my duct face?” Pat confusedly and emphatically shook his head no–he wanted nothing to do with whatever my duct face was. I flipped him the latest version of my cooling duct and then we had a good chuckle.
- Cooling Fan Duct For Silverstone DS380 Case on the briancmoses.com store on Tindie
- Cooling Duct for SilverStone D380B on Printables.com
- Cooling Duct for SilverStone DS380B on Makerworld
If you’re planning to follow the DIY NAS: 2017 Edition and you have access to a 3D printer, I’ve posted and shared my cooling duct for the DS380B on Printables.com. Please feel free to print yourself a pair. While you’re there, please go ahead and like it and let me know that you made one! Don’t have access to a 3D printer? Then check out how awesome Pat is by printing and selling the pairs of the cooling ducts on his Tindie Store.
After adding the cooling ducts to the DIY NAS: 2017 Edition, drive temperatures fell a bit more, but not as dramatically as previously. The temperatures dropped down to between 31 and 38 degrees Celsius (87.8 to 100.4 degrees Fahrenheit). While this wasn’t as dramatic of an improvement as my earlier steps, after installing the cooling ducts I could definitely feel more air exiting the back of the drive cage than before. I think that if the DIY NAS: 2017 Edition were fully loaded with eight drives, you’d see a marked improvement in the drives’ temperatures.
For builders who are aspiring to build their own versions of the DIY NAS: 2017 Edition and others who want to house their own DIY NAS in the SilverStone DS380B, I’d strongly suggest finding a way to minimize the case’s air gap. Printing or acquiring a pair of these cooling ducts would help reduce the size of that air gap and force more of the intake airflow into the hard drive cage and over your hard drives.


