

I recently purchased two QNIX 2710 monitors for my new dual-monitor setup, and while setting that up I realized that I was embarrassed at the rat’s nest of cables I had accumulated behind my desk. It was unsightly and frustrating to work with. I’ve been meaning to do something to get the cables under control but I have been procrastinating. I’ve liked some of the cable management ideas that I’ve come across before, like using rain gutters for cable management or even installing PVC pipe to manage cables.
A couple weeks back, I had a brainstorm while out in the backyard with my dogs after work one day. I got to looking at our fence, most notably the metal fenceposts. There are round brackets that went around the post and were screwed into the two-by-fours that made up the structure of the fence. My brainstorm was to install several of those (fewer than 10) and run my cables through them. I thought this was such a great idea that I ordered several of the fencepost grip ties from Amazon to try them out. Unfortunately, they wound up being a bit too large; my desk has a keyboard drawer built into it and the ties didn’t fit between the backside of that drawer and the lip around the desk’s surface.
Feeling like I was on the right track, I set out for Home Depot one night after work and aimlessly wandered the aisles looking for an inexpensive piece I could screw to the underside of my desk and run cables through them. I strolled down the electrical and plumbing aisles but nothing jumped out at me. Then I took a look at what was around the fencing aisle and I found something promising right on the aisle’s end-cap. A Chain Link Fence Tension Band, which I presume is used with a nut and bolt to clap the chain link material to the fence posts. The best part of these bands? They were very inexpensive at Home Depot at $.98 each.
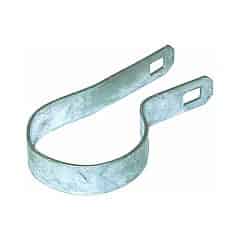
These wound up being ideal for what I had cooked up in my head. The shape was exactly right that it’d be easy to run cables through them. And anything that had an end which was too fat to fit through could have its cable pushed through where the band clamps together. I intended to use a wood screw and washer(s) to screw the flat part of the band into the desk, leaving the band un-clamped.
The Plan
- Every 9 or 10 inches, one of the Chain Link Fence Tension Bands would be screwed into the bottom of the desk, between the keyboard drawer and the lip on the back of the desk. The tension band would be installed in such a way that it remained “open” for easier access.
- A couple of the tension bands would be installed “closed” on the rear leg of the desk to fully hide the cables being routed down to the computer.
- I would use some leftover velcro from My Network Cupboard project to line the underside of my desk’s surface, wrap power adapters in the opposite side and then stick them underneath the desk to hide them from view. Those power adapters would then be plugged into …
- … a surge protector mounted underneath the desk either to the left side of the desk’s lip or the left side of the keyboard drawer.
- Pat would 3D print some brackets like the ones he made for his QNIX 2710 monitors and speakers. Those brackets would be used to clamp the monitor’s power adapters to the monitor mount’s arms. The power cables would be routed down through the monitor mount to a power splitter cable plugged into a 10-foot power extension cord and ultimately into my UPS.
- I would NOT resort to using methods that’d interfere with future cabling I had to do. So things like my trusty zip strips, hot glue gun and J.B. Weld were out of the question.
The hardest part of this whole DIY project was getting the chain link tension bands screwed in. This was mostly a logistical problem, and the fact that I’m hopelessly clumsy didn’t help much either. I picked out some pretty short wood screws, but the bands have pretty large holes. To close that hole, I wound up using a couple different-sized washers. So, I was trying to keep two washers on a wood screw, fed through a tension band and then screwed into the underside of my desk all while lying on my back. I even drilled pilot holes in an effort to make it easier, but alas it took quite a few tries and a couple four-letter words to get it right. Had I removed everything from the desk and flipped it over, this wouldn’t have been an issue at all.
I chose not to add some more chainlink tension bands to the elbow piece and cart that make up the short side of my L-shaped computer desk because those pieces lacked the lip which hides them on my desk. My thought was that the exposed tension bands would ultimately make it look a bit messier than if I neatly routed the cables along the bottom of the media cart.
Originally, I planned on black carpet tacks to hold a few strips of velcro to the underside of my desk. But the degree of difficulty of this also was multiplied by the fact that I was upside down. After a few frustrating attempts resulting in tacks falling on my face or going in at peculiar angles, I decided that I’d just use some of my remaining wood screws to pin it to the underside of the desk. It took me longer to put in two carpet tacks poorly than it did the other dozen or so wood screws. I installed the velcro with the furry side exposed, then cut up some strips and wrapped my power adapters in both directions. At first, I was a bit dubious of whether or not my velcro would hold the bricks. I tested it out just to see how it would work and I was pleasantly surprised to find it took quite a bit of force before I was able pull it down. I’m confident that now they’re up there, they’re going to stay in place until I want them down.
Finally, I affixed a surge protector to the outside of the keyboard drawer on the lefthand side of the desk, just beneath all of the velcro. I tidied this up a bit by wrapping up the excess cable in velcro and sticking both the power bricks and the bundled cables to the underside of the desk. The velcro also worked surprisingly well; had I known that, I would’ve been tempted to completely coat the underside of my desk in velcro first so that I could use it to easily hide things like the power adapters. If Pat not printed two sets of his 3D-printed brackets for me to use, this is exactly how I would have hidden the monitors’ power adapters.
Photos


Conclusion
I’m nitpicking a bit, but there are a couple things I wish I could have done better. Firstly, the network jack and the power (my APC Back-UPS RS 800) are located to the right of the desk: on the wall and on the cart attached to my desk. So there’s three power cables (extension cable for monitors, surge protector for accessories and the computer’s power cable) routed to the right of the computer. I bundled the three cables up as nicely as I could and made it look as nice as possible, but it’s not as clean as everything to the left of the computer. I’ll be brainstorming on how I can improve that.
Overall, I’m really pleased with the result. My mess of cables is virtually eliminated. On top of that, it’s been done in such a way that it won’t be difficult to make changes in the future. In past cable management projects, I’ve made the mistake of using things like zip strips to permanently group a clump of cables together. And even though this might look pleasing to the eye, it is also a nightmare to go back later and make a change. All of my cables are organized and/or hidden, but none of them are inaccessible, which is a tremendous benefit.
The icing on the cake was how inexpensive this was to do. Theoretically, I probably could have done most of this for under $10.00. It helped that I had some odds and ends laying around the house, like the velcro and spare extension cables. But the chainlink tension bands were the most important part of the project and they were also the cheapest. In my experience, most DIY projects don’t usually work out that way.
Furthermore, for projects like this one it’s proving to be invaluable having a friend with a 3D printer and excited about the concept. If you want to come up with your own unique cable management solution, a friend with a 3D printer is indispensable. My suggestion is that you either become one by buying a 3D Printer like Pat did, or make a friend who has a 3D printer!
If you have a cables rat’s nest of your own, I recommend tackling it. Maybe not exactly like how I decided, but in some form or fashion. Do some Googling and get some ideas, then just wander around a hardware store. You’ll be surprised the things you think of! My only warning is to be prepared for a minor hiccup or two; there’s almost certainly going to be a cable that’s just not long enough to follow your neatest route. Take a stab at it, make a list of additional cables that you need, and then clean it up a couple days later when you get those cables.
How about you guys, how do you handle cable management behind your workstations? Please feel free to show off your solutions in the comments below!