
When I was growing up, the arcade in the nearby shopping mall would put price tags on all of their games around Christmas time. I dreamt about finding one next to the Christmas tree with a big bow on it. However the price tags on the games were numbers much bigger than we’d covered that semester in elementary school; this is probably when I first experienced “sticker shock.” However, a dream had been planted
Quite a few years ago, I heard about MAME(short for Multiple Arcade Machine Emulator), which used your PC Hardware to emulate a classic arcade machine. I collected a few copies of my favorite games and had some fun for a couple months playing all my favorite arcade games on my computer. However, there was something missing. It wasn’t authentic enough.
The friend who introduced me to MAME beat me to the punch a while back, he built a cocktail cabinet style arcade machine from scratch and blogged about it. He did this while living in another state. Once he moved back to Texas and I got to see it, I went from just a little bit envious to jealous in no time flat. It’s a neat and very fun toy to have.
Within the past year my ‘some spare PC parts collection’ grew considerably as a result of a computer upgrade, and just recently I decided to use those parts to build my very own upright arcade cabinet.
Build it from Scratch vs. Rebuild Existing
The first decision I made was to decide between building it from scratch or refurbishing an existing arcade cabinet. Both had their pros and cons. Building your own means you can design something from the ground up to meet your exact specifications, which is appealing. However, it involves a certain amount of woodworking and investment in tools that I didn’t necessarily have. Furthermore, the more unique and customized your arcade cabinet is to your specific needs, the more you risk some of the authenticity of the cabinet.
Refurbishing an existing one is an attractive option. In that case, you find a cabinet already assembled and then get it back into shape. The tradeoff of saving time on assembly and tools, however, is that you have to spend a lot of time shopping and keeping an eye out on the exact cabinet for you. There’s also risk of having to pay a little bit extra for complete the cabinet.
For my project, I ultimately decided that I wanted to refurbish an existing cabinet, preferably something that I felt came straight out of an arcade. Because I try and be as frugal as possible when indulging my whims, I wound up surfing Craigslist for a few days. What I was looking for was a damaged machine that wasn’t working and had a shape that I liked. Unfortunately, most of what I found was functional and thereby expensive, or broken-down games that had unappealing shapes and looked to be too much work.
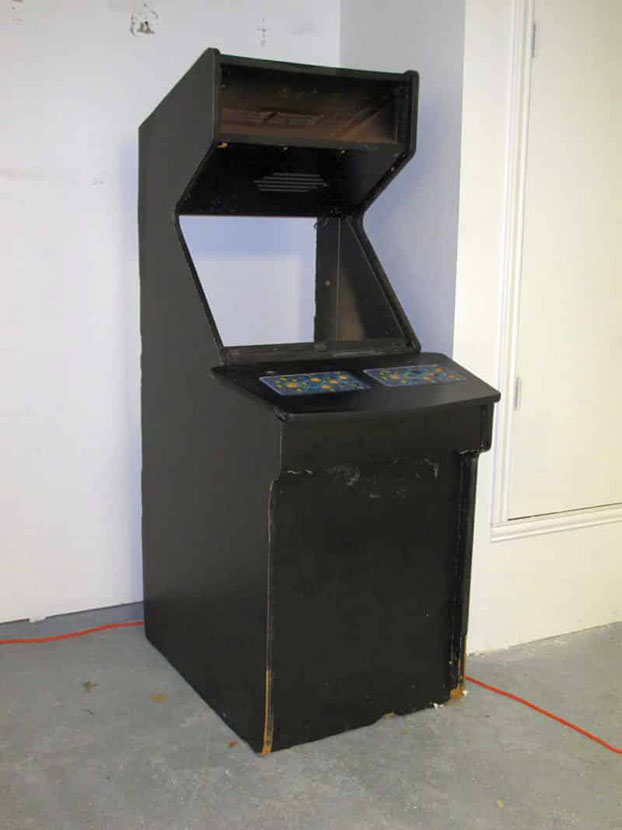
Luckily, I tweaked my search terms and found a listing for an arcade cabinet that someone appeared to have already started refurbishing but was getting rid of it for some reason. At its price, I was worried that it would be pretty beat up, but overall, I thought it was in pretty good shape. It’s got more than it’s fair share of dings and dents, and there’s quite a bit of work that it’s going to require, but I literally wound up savings hundreds of dollars over the other options available for fully-assembled cabinets. I bought the cabinet for $100 and I definitely feel that I would’ve spent way more than $100 in tools, supplies, and frustration just to get it to the shape it is in today.


Goals
- Keep it Authentic: The cabinet in its shape needs some TLC. I tried to get it in the pictures, but there’s a few things that I need to fix up: there’s no back on the cabinet, the back and the bottom of the cabinet frame is pretty dinged up and I’ve got some other structural ideas shooting around in my head that I’d like to see. Whatever changes I make, I want those changes to be as authentic to the arcade games that I remember from the 80’s and 90’s as I possibly can.
- Use an LCD: In terms of the cabinet’s display, I’m willing to make an exception to my authenticity goal. Updating the display from a CRT to an LCD makes sense
- Include a Trackball: This is one thing that Pat has strongly suggested for my own arcade machine, both for games that require a trackball and also as a pointing device for the PC that’s powering the arcade machine.
- Return it to 4 Player: From the underside of the control panel it looks like this cabinet started out as a 4-player game, possibly Crime Fighters or The Main Event but somewhere along the line it was repurposed as some sort of a Mortal Kombat cabinet instead. I think that we’ll wind up rebuilding the control panel from scratch and build out a wider 4-player control panel like Konami did with The Simpsons and X-Men.
- Make it Mine: Even though the cabinet is already built, there’s plenty of opportunity for me to put my own mark on it. We’re going to invest some time and energy into redoing the control panel, and there’s damage to the back and bottom of the cabinet which will require our attention and will ultimately reshape the cabinet a fair amount. This my chance to “sculpt” it into my own unique creation. Hopefully it’s subtle yet noticeable.